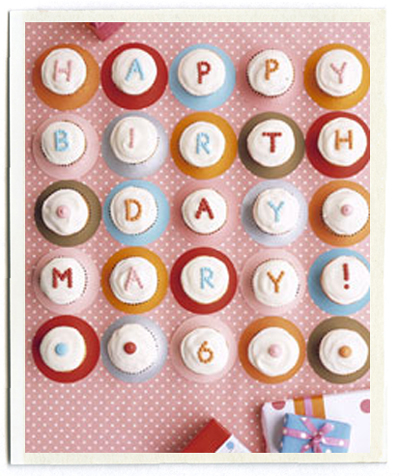
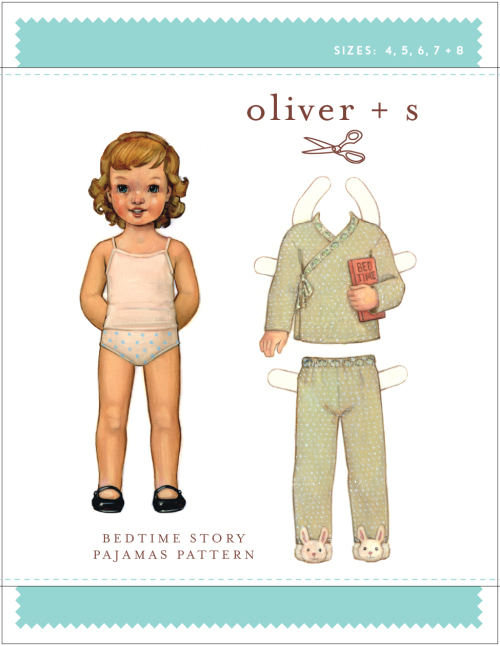
Wednesday
Feb182009

little pajamas

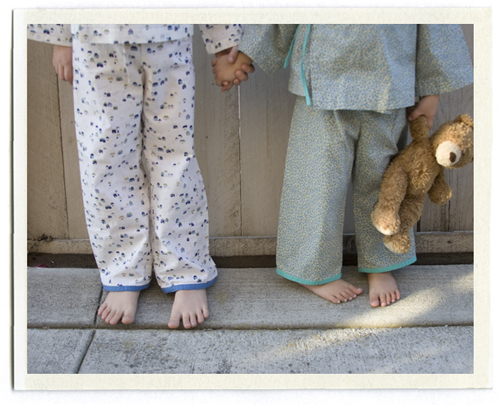
As many of you know, I design all the visuals and graphics for Oliver + S, a company my good friend Liesl Gibson started that sells sewing patterns for children's clothing. Last year when we were thinking about the new fall line, I suggested we do a pajama pattern. Growing up in my family, we always opened new pajamas each Christmas Eve. I've continued the tradition, but the pajamas in the stores were just ho-hum and I was hoping that with a new pattern from Liesl, I could make something the kids would really love...  Enter the Bedtime Story Pajamas pattern.

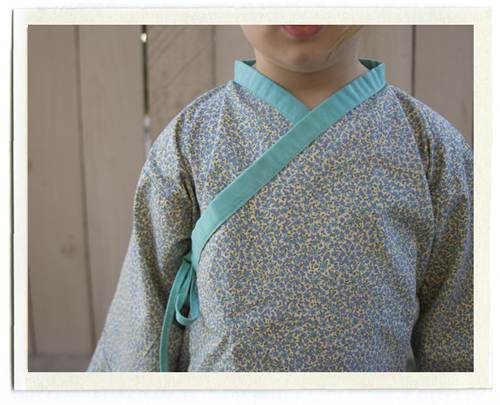
I'm fairly new to sewing, but the Oliver + S patterns have eased me into garment making. I'm not as fast as Liesl (who once made these pajamas for her daughter in one evening between dinner and bedtime) but I'm so pleased that I can follow the step by step instructions and without too many mishaps, end up with something close to the illustration (not always the case with children's patterns!). I finished Bee's set before Christmas, but at about midnight on Christmas Eve I threw in the towel on C's top..  he did get to wear his pants to open gifts Christmas morning, and the top finally got finished a few weeks ago.

I am a bit of a skimmer when it comes to directions. Though I'm new to sewing, I always kind of peruse the illustrations and then start sewing without reading any of the actual instructions. (Probably why I don't mind using Japanese craft books..) After sewing a few things with Oliver + S patterns, I've learned to trust Liesl and to actually read them step by step. She'll often give you a hint or make things easier for you if you just listen and do things in the order she has specified.

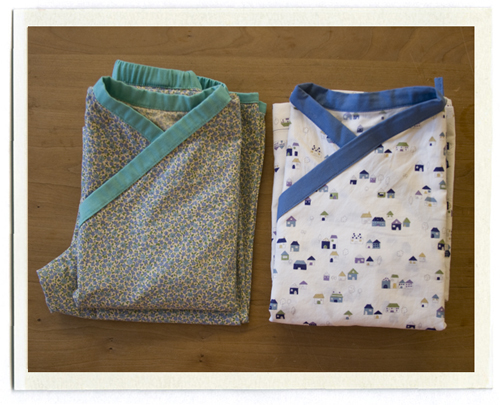
The fabric I used comes from Purlsoho. I didn't want them to match perfectly, or to make them from the same fabric, I just wanted them to be in the same color family so they would look cute together. Bee's is mini garden from Kobayashi in the blue color and C's is neighborhood, also from Kobayshi in the blue color. The trim fabric is just a solid color, I think these were from the Kona cotton line.

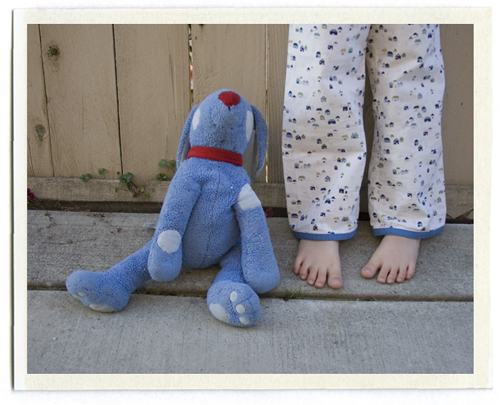
I tend to spend more time sewing for my daughter than I do for my son. It just happens that way, it's not intentional.. skirts and dresses don't scare me, pants and shirts do. He really gets excited when I am working on something for him. He tells me he sleeps better in these pajamas because "they're made with love."  And he's right.. they were made with love. And somehow I think they can feel that when they wear them.

Just to clarify: When I say I do the visuals for Oliver + S, I don't mean the actual illustrations on the Oliver + S patterns, those are done by the very talented Dan Andreasen. I design the packaging, logos, website, tradeshow booths and that sort of thing.. just wanted to make that clear.

Sunday
Feb152009

this week's library book

It's been a lovely warm winter here in southern California, so I've been trying to find a few books that remind the kids what snow looks like. (They seem to have forgotten our many winters in Brooklyn.) This sweet book You Can Do It, Sam by Amy Hest almost makes me miss waking up to a fresh layer of snow on the brownstones.

Sam and his mom spend a snowy morning baking cakes. (I must say that Mrs. Bear is the most patient, sweet little mother I have ever seen.. I should try to be more like her when I am baking with my kids...) When the cakes are ready, they wrap them up in little red bags with a sign that reads "A Tasty Surprise".

The snow continues to fall. Sam and Mrs. Bear pack up their cakes in their adorable green truck and set out to deliver them to the neighbors. Mrs. Bear waits in the truck as Sam makes his way through the snow to each door, leaving his surprise on the doorstep. "You can do it Sam!" says Mrs. Bear.

After delivering their cakes to all the neighbors, they return home. Just two cakes are left, one for Sam, and one for Mrs. Bear, which they enjoy in front of the fireplace.

Inspired by this book, we're starting to bake treats more often around here. Instead of eating them all ourselves (which is surprisingly easy for us to do), we're packing them up and dropping them on the doorsteps of our friends and neighbors. We try to make it very dramatic.. I run up to the door, drop the treats, ring the doorbell, and run as fast as I can back to the car (sometimes losing a flip flop along the way) and JR drives off as fast as he can. We have yet to be caught.

Monday
Feb092009

my little valentine

I'm not so into heart shaped boxes of chocolates or a dozen red roses, but I'm very much into these little guys.

Valentines day is here, and my little ones need something to drop off with their friends... preferably something cute and little and filled with candy. I was remembering some little Christmas matchboxes we did when I was at the Kids magazine, so we revamped them for Valentine's day. 

You can find little packs of matchboxes at the grocery store, I found mine near the cigarettes. They usually come in packs of 10 and shouldn't run you more than $1.50 or so. (Dump the matches out and save them for your next blackout.) Cut a piece of paper 2" high (or the height of your matchbox) and about 4" long (enough to wrap all the way around). I used a bit of tape to secure it on the back.

You can do these anyway you like. I love the portraits C drew of his friends at school (his idea).. They may all look the same at first glance, but he can tell you who each one is. I cut the paper down to the right size first, then wrapped it around the box after he was finished. For other matchboxes I used a little heart punch and glued a little bit of paper underneath. And some got a simple little band. 

Fill with candy (regular m and ms and candy corn will fit nicely), tuck in a little note, wrap with string if desired, and add a name tag or first initial. Then off to school!

Thursday
Feb052009

art for the people


Readymade has a great article about the WPA and the creation of the Federal Art Project, launched by Franklin Roosevelt during the Great Depression. As Steven Heller writes in the introduction "The FAP served a dual purpose: It gave unemployed artists work while demonstratively branding the virtues of the nation through rousing mass communication." Most posters were silkscreened, which explains the lack of photography and the simple typography (I love them all). 

The posters promoted all kinds of topics including basic hygiene, tourism, health topics, workplace safety, theater, education, public libraries, and community events. Though I feel a bit bad for the poor fellow who had to do the poster for venereal diseases.

Readymade then asked 5 artists to create a WPA inspired poster for today. My favorite comes from Nick Dewar, an illustrator who always makes me happy with his hand drawn type. (I had the pleasure of working with him once for an article I did at MS Living). You can download a large PDF version of his poster here.

Here are a few of my favorite WPA posters:


Tuesday
Feb032009

bee's party

On Thursday we had a few of Bee's friends come over to help celebrate her birthday. My advice to those of you throwing a party for a three year old: Keep the guest list on the short side. We had 6 kids (plus my own two) and we were plenty busy!

I fell in love with the idea of a felt birthday crown after reading SouleMama's amazing book. I had high hopes of embroidering this one, but it ended up being just glued together. Bee loved it anyway. We made paper versions for each of her friends to color and sticker and wear at the party.

We blew all kinds of bubbles and played all kinds of games (the most popular being where we hid balls all over the backyard and had the kids run and find them.. endlessly entertaining for the 2 year old set).

We ate fancy peanut butter and jelly, clementines, round jello jigglers (a request from the birthday girl herself), pretzel sticks, grapes, and juice boxes (of course). 

And cupcakes. We used the leftover dots from our cake, and pressed them into freshly frosted cupcakes. Bee blew the candles out in one go.

Favors were round gumdrops and candy dots in yellows, oranges, pinks and reds. The tags are made from metal rimmed office supply tags with sticker letters (in the scrapbook section of any craft store).

All in all, one fun party.. One special little birthday girl.

(Before you make fun of me for spending time on details that no 2 or 3 year old would ever notice, please understand that I cannot control my party planning habits. After working at Martha Stewart for so many years, these things just happen.. they can't be stopped. Ask my husband, he's tried.)

Saturday
Jan312009

this week's library book

Such a jewel this week. I went to the library for something else, and making my way through the J's stumbled upon The Incredible Book Eating Boy by Oliver Jeffers. A good cover will usually catch my eye, and the hand lettering on this one is lovely.

Henry loves to eat books. First one page at a time, then entire books in one go. And the more he eats, the smarter he gets. 

If he reads a book about rockets, he can remember every detail. Soon he is the smartest kid in his class, and is explaining things to his teacher.

When he starts eating too many books too fast, the contents start to get all mixed up. When he tries to remember something, all that comes out is confused mumbles.

So he has to give up eating books, but he starts reading them instead.. and gets smart the old fashioned way. (Although there is a nice size bite out of the back cover.. he must nibble now and then.)

I'm a lover of paper. Striped, gridded, lined, bright white, old and faded.. I love it all. What really makes me love this book is how Jeffers uses different kinds of paper as the backgrounds for his illustrations. And he leaves it messy, with the 3 ring holes intact or the torn edges showing. It's such a special little treat.

Wednesday
Jan282009

making a dot cake

Many of you have asked, and since it is a cool little trick, I'll tell you the secret to my dot cake. I picked up this tip while working on a polka dot birthday party for Martha Stewart Kids (see the cupcake image above, shot by Gentl and Hyers) It's still one of my favorite stories.. and the inspiration for Bee's party tomorrow.

Instead of piping directly onto the cupcakes, our food editor piped royal icing onto parchment paper and let it harden. After letting it sit overnight, you can pick up the dots and place them wherever you like. Great for people like me who get nervous piping! I've used this for numbers and letters too... in fact we made monogrammed cupcakes for my sister's wedding using this technique.

Make a batch of royal icing and match the colors of your party as well as you can. Mixing colors is kind of an art in itself, and one I certainly have not mastered. My advice is to start slow, it's easy to add more color, but impossible to go backwards. I picked three colors from Bee's invitation: orange, peachy pink, and a brighter salmon pink. Scoop the icing into a piping bag and using a small round tip, pipe dots of different sizes onto a cookie sheet lined with parchment paper.

You can see that mine are not perfect circles.. my icing was a bit on the runny side. Next time I'll go a little thicker. Leave them overnight to harden and then carefully pick them up with a thin spatula and place them wherever you like on your cake. I made Bee's white cake with two 6" layers.. I love the proportions of a 6" cake, taller but with thicker layers than a standard layer cake, it's a perfect kid-sized cake. Frost with your favorite frosting and add your dots where you see fit. I try to serve the cake in the next hour or so. (Leave the cake out at room temperature.. I'm not sure, but I think if you put it in the fridge overnight, the color on the dots might run). 

I made a large batch of dots. Half were used on the cake for our family party and the rest will be used for cupcakes at her friend party tomorrow. Speaking of, I better get baking! I've got cupcakes to make and mobiles to hang!

I almost forgot to point out the coolest part of this trick: If you are piping letters or numbers and your piping skills could use a little improvement, print out the letters on a sheet of paper and slide it under the parchment sheet.. it will serve as a guide for you to follow with your piping bag. And if you mess up, just start over again!

Monday
Jan262009

bee turns three

My little one turns three today, and that can't possibly be true. She is such an awesome little girl.. so funny, fiercely loving, opinionated, always twirling or jumping or showing us her latest trick. We love her so. We had a family get together last night, with cousins, aunts, uncle, grandparents... it's so nice to live by family. We'll be having a little friend party later this week, with a polka dot theme. She has asked me twelve times this morning if her party is today. 

In honor of Bee's third birthday, I give you this template so you can make fabric balloon birthday tags for your loved ones. Follow the instructions shown here. Enjoy!

Thursday
Jan222009

lights out

Reading a book or two at bedtime is part of our nighttime ritual. I love cuddling up with my little ones and reading with them. It's the perfect way to end the sometimes not so calm day. But there is something new I've been wanting to try.. a chapter book. (I attempted this last year with Charlotte's Web, but the kids grew tired of it after about a week. It's nice to see how much their patience has grown in a year.) 

We gave the kids a copy of Stuart Little for Christmas, so we've been trying to read a chapter a night. And we've made a few changes to our nighttime ritual. We're gathering in mom and dad's bed, where we all get to sit under great grandma's big quilt. And the best part.. we've been reading by flashlight. (Thanks to Jennifer and her lovely blog for the great idea) After we finish the chapter, we play a game of flashlight tag on the ceiling before shuffling the kids off to their beds. 

Stuart Little is a wonderful little book, I may have liked it as much as the kids. Each chapter is a complete little story, so it's perfect to read in little chunks. We would talk about Stuart's adventures throughout the next day, and I would try to help the kids remember what had happened the night before.  When we finished the last chapter a few days ago, both Bee and C were sad to see Stuart's adventures end. And so am I.

We'll go back to picture books for a bit before starting our next chapter book.. any suggestions? (My kids are 2 and 4, so it needs to be short and not too involved.. and a few illustrations along the way really helps my littlest one stay interested.) What should we read next?

Want to know more about Stuart Little and how the book was written? I almost forgot to mention this article I read last summer in The New Yorker. 

UPDATE: Guys! Wow, thank you all for taking the time to let me know your favorite books. I just finished reading through all of your recommendations and I think we will have plenty of great books to read for the next few months.. maybe years! Thank you!

Tuesday
Jan202009

baby #4

My dear friend Emily is having a baby, her fourth, so we got to have a little shower to celebrate. I find it really hard to take photos during a party (there's so much running around right before and the light is never very good) but I managed a few shots.

I wanted to hang some hearts over the table but once I cut/punched all 50 or so, the thought of punching holes and tying them all to string seemed a bit ridiculous. Saved again by my sewing machine... much faster.

I put together a little quiz (thanks to Emily's mother) about Emily when she was younger. The best question was about her getting sent to the principal's office in second grade for throwing spitballs at the ceiling in the girl's bathroom. Heart toothpicks for some of the food (two hearts stuck together with a bit of double stick tape).

It's nice to not have to deal with cups and ice at parties, so I'm a fan of water bottles. And they always look cuter with new labels. Emily's favorite drink is IZZE (her favorite is actually the raspberry flavor, but she likes the pomegranate too and well, it matched the color palette better). I'm not above choosing drinks solely on their color.

Light blue and white sugar cookies, with a few red ones thrown in. These heart cookie cutters are from an old kit from Martha by Mail, I wish I had bought one of everything they sold while they were still in business. So well designed and so well made.

Emily's sister was kind enough to pick up some Sprinkles cupcakes, and the red and blue candies on top were perfect. Although my cupcake love is reserved for Magnolia Bakery, these are pretty good too.

My sweet sister in law ran all over town trying to find some red heart candies. I used my new favorite trick for the tags, punching out the heart shape and putting fabric behind it. I think we'll be trying something similar for Valentines day... stay tuned.